तेल सील स्थापित करना - चरण दर चरण
तेल सील स्थापना से पहले
यह सुनिश्चित करने के लिए कि कोई खामी या विकृति तो नहीं है, तेल सील का पूरी तरह से निरीक्षण किया जाना चाहिए। ओडी पर बहुत छोटी सी खरोंच सील में रिसाव का कारण बन सकती है। यह पुष्टि करने के लिए बोर का मूल्यांकन करें कि कोई खरोंच या अवशेष मौजूद नहीं है। पहली बार चलाने के दौरान होंठों की सुरक्षा सुनिश्चित करने के लिए सील और शाफ्ट को चिकनाईयुक्त किया जाना चाहिए।
स्थापित करने के तरीके
उचित जुड़ाव की सुविधा के लिए और सील कॉकिंग की संभावना को कम करने के लिए, रोटरी शाफ्ट सील स्थापित करते समय तेल सील स्थापना उपकरण का उपयोग करने की सिफारिश की जाती है। प्रेस फिटिंग टूल (अधिमानतः वायवीय या हाइड्रोलिक प्रेस) का उपयोग करते समय, सुनिश्चित करें कि टूल का ओडी .01″ (.25 मिमी) बोर के आकार से छोटा है।
सील कॉकिंग:
सील कॉकिंग तब होती है जब सीलिंग लिप के एक तरफ शाफ्ट हस्तक्षेप अधिक होता है, जो तेल सील के कार्य पर नकारात्मक प्रभाव डाल सकता है। इससे अधिक गर्मी पैदा होती है और सीलिंग लिप कठोर और टूट जाता है। बदतर मामलों में, यह सीलिंग लिप से स्प्रिंग को विस्थापित कर सकता है।
स्प्रिंग बेक:
रबर से ढके ओडी का उपयोग करते समय, स्थापना के बाद सील वापस आ सकती है। सील और बोर का रबर ओडी घर्षण पैदा करता है और दबाए जाने के बाद सील को स्थापना बिंदु से हटने का कारण बन सकता है।
स्थापना के उचित तरीके
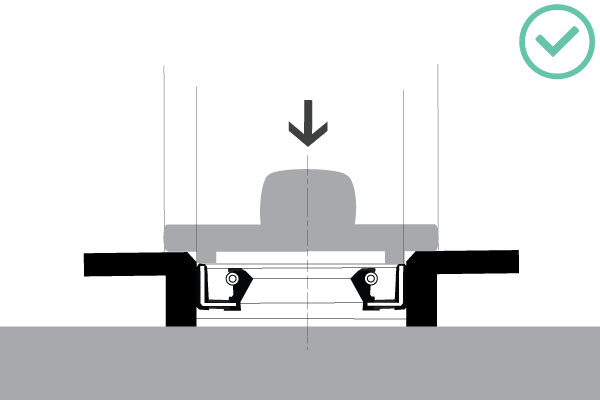
हाउसिंग सरफेस स्टॉप इंस्टालेशन:
- इंस्टॉलेशन टूल का निचला भाग मशीनी हाउसिंग फेस से मिलता है।
आवास रोक स्थापना:
- सील का निचला भाग बोर के आंतरिक कंधे के समान है।
सरफेस स्टॉप इंस्टालेशन:
- इंस्टॉलेशन टूल का निचला भाग मशीनी हाउसिंग फेस से मिलता है।
स्प्लिंस पर सील की स्थापना:
- इंस्टॉलेशन टूल चिकनाई युक्त है, जो स्प्लिन, कीवे और अनचाम्फर्ड शाफ्ट से सील लिप क्षति को रोकता है।
स्ट्राइक प्लेट स्थापना:
- यह सुनिश्चित करने के लिए सावधानी से आगे बढ़ें कि सील लगाते समय सील और बोर ठीक से संरेखित हों।
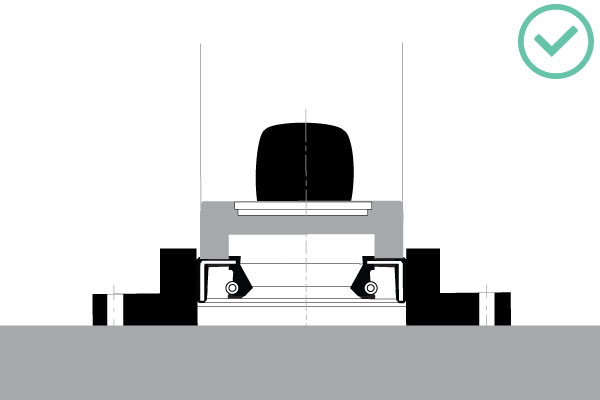
शाफ्ट स्टॉप इंस्टालेशन:
- इंस्टॉलेशन टूल का निचला भाग शाफ्ट के मुख से मिलता है।
स्थापना के अनुपयुक्त तरीके
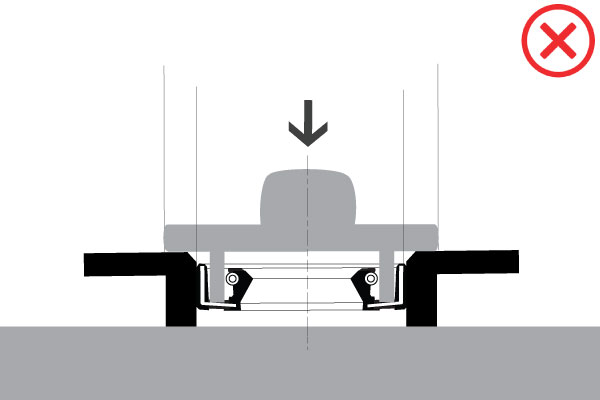
नीचे वर्णित तेल सील स्थापित करने के गलत तरीके हैं। ये गलतियाँ अक्सर देखी जाती हैं, हालाँकि उद्योग में इन्हें न तो समझा जाता है और न ही इनकी निंदा की जाती है। गलत तरीके से स्थापित तेल सील में छेद हो सकता है और विकृत हो सकता है, जिससे इसकी कार्यक्षमता कम हो सकती है। अनुचित स्थापना, यह बोर में समा जाएगा और सेवा में विफल हो जाएगा।
ग़लत ड्राइविंग:
सील लगाते समय उपयुक्त ड्राइविंग रिंग का उपयोग करें। अनुचित ड्राइविंग रिंग का उपयोग करने से सील में विकृति और गलत संरेखण हो सकता है।
अंडरसाइज़्ड इंस्टालेशन टूल:
यदि इंस्टॉलेशन टूल का ड्राइविंग व्यास बहुत छोटा है, तो इससे इंस्टॉलेशन के दौरान सील ख़राब हो सकती है।
अपर्याप्त रूप से इंजीनियर किया गया इंस्टालेशन टूल:
यदि सील के लिए इंस्टॉलेशन टूल सही नहीं है, तो इससे विकृति हो सकती है।
गलत संरेखण त्रुटियाँ:
यदि उपकरण और बोर समान रूप से नहीं मिलते हैं, तो सील विकृत हो सकती है और/या बोर में चिपक सकती है। इस प्रकार, मामले को सील करने के लिए एक लीक मार्ग तैयार किया जा रहा है।

 हिन्दी
  English
  Español
  Français
  Português
  Deutsch
  Italiano
  Русский
  中文
中文  日本語
日本語  العربية


